A couple of decades ago, the ways to talk and check in with our loved ones were minimal. They were only limited to letters and very expensive phone calls. After this, Emails came into prominence. However, they were also a luxury only the rich could afford.
But, with the increase in mobile phones and the explosion of the internet, things started to change rapidly. Suddenly, talking to your friends and family was just a matter of a few clicks on your mobile phone. Initially, the prices of these devices and internet services used to be higher.
However, with the rapid decrease in prices of internet services and phones, there is practically no limit to how much you can talk. Another factor that, in my opinion, has brought friends and family closer ( at least virtually ) is the rise of social media.
Let’s be honest, we are all part of at least one group on Whatsapp or Instagram. Be it a family or a fun friends group, being involved in a group is a must-have experience.
Many of us enjoy sending memes and jokes to our friends on Instagram. Being in a group chat makes it all the way easier to send them to all, and all your friends can share a laugh there.
While using the platform is very easy, creating a group on Instagram can be a little confusing. If you are searching for instructions on how to create a group on Instagram, you’ve come to the right place.
In this article, I will guide you through the process and make it easier for you to create a group on Instagram and enjoy the thrill that comes along the way.
Creating an Account
Before you start to enjoy the shenanigans of a group chat, you’ll need to have an Instagram account. Creating an account is very simple. You just have to log in to Instagram.com on your PC or just download the app.
Once you open the application, you need to enter either your mobile number or your email. The next step would be to enter your full name and then enter your preferred username. In case you’re chosen username is not available, you will be given a few suggestions to choose from.
After this, all you would need to do is create a password of your choice, and voila, your account is created. If you already have a Facebook account, then there is also the option to link the account, and you can skip the above process.
Now that I have provided the instructions regarding “How to create a group on Instagram,” it’s time to learn how to create a group on Instagram.
Step 1
The first and foremost step in creating a group is to open up your app on either your phone or your PC.
Step 2
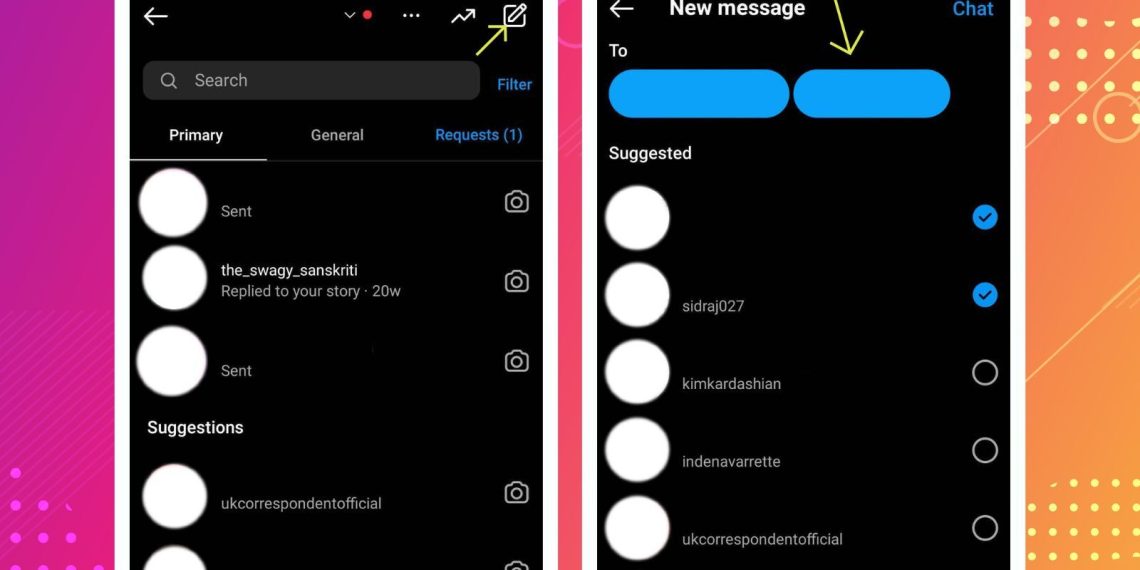
The next step in creating a group on Instagram is to click on the direct messages ( DM ) option. Keep in mind that if you have synced your Facebook msgs as well, then your DM icon would be the same as the Facebook Messenger icon.
The direct message icon will be on the top right corner of your phone. Whereas, if you’re browsing on a PC, the icon would be on the left panel of your screen.
Step 3
Once you have opened the DM screen, you will see an option to create a new chat in the top right corner of the page.
Step 4
After opening the option for a new chat, you will see some suggested people that you can add. If you are able to see all the suggested group participants, then you can just select them. If you do not see them, then there is an option to search them by name and add them to the list.
Step 5
After selecting all the group participants, you will see an option on the top right side to ”chat.” Just tap the button, and you will enter the group. The process is not yet completed. However, the group will only finish being created once you send the first message.
Once you’ve sent the first message, you can give the group any name you’d like, and your group is created.
Adding or Removing the Participants
As time passes, you may want to add or remove some of the participants from the group. I can assure you that the process is fairly easy for this.
If you are looking to add some new members, then all you have to do is open up your direct messages section and select the group from your chat list. In the chat, you would see the option to see the group members. Just tap the option and scroll to the end.
At the bottom of your screen, you will see an option to add more members. From there, you can select as many new members as you want to add, and they will be included in your group list. Note that the maximum number of participants in a group can not exceed 32 members.
In case of removing the current members, just open up the group from your chat list. From there, just click the button to view all members. Once you are able to see the list, just scroll to the member you want to remove. You would see three dots icon next to their name.
To remove them, just tap the three-dot icon and click on the remove user option and that member will be removed from the list.
In The End
Social media is a very fun place to be. It has something for everyone. Be it funny jokes, motivational quotes, natural beauty, or something related to sports, everyone has something to be entertained by on social media.
While there are a lot of platforms, Instagram certainly reigns above them all. With its amazing features and ease of usage, it is the favorite for a reason. The option of creating a group adds another feather to their cap and another amazing feature for us users to take advantage of.
In this article, I have provided you with instructions regarding how to create a group on Instagram. With this, you can create a group and enjoy among your friends by sending out memes, jokes, or some funny inside jokes.


